Tuesday, June 16, 2020

Watercolour Rainbow Blanket

Little Crochet Makes - Watercolour Rainbow Blanket


You will need:
1x Scheepjes Stone Washed - River Washed Colour Pack (58 x 10g balls)
4mm hook

This is a simple, easy to make whilst watching the TV, kind of blanket. You will need to know how to double crochet (single crochet in US). I used the magic knot technique to avoid sewing in ends (you can find help on YouTube, if you need it). 

Finished blanket is roughly 72cm wide, 1.25 meters long

To begin, organise your balls into a colour order. I did the following: 
Black, Brown, Grey, Cream, Purple, Magenta, Lilac, Light Blue, Blue, Turquoise, Green, Light Green, Yellow, Mustard, Peach, Orange, Fuchsia, Pink, Pale Pink

1) With the first colour, chain 115

2) Double crochet in the second chain from the hook, then continue to double crochet back along the starting chain. Continue to work in the same colour until it runs out, then join the next colour with a magic knot. 

It doesn't matter if the colour runs out in the middle of a row, the idea is that you keep going. With this blanket, you don't have to worry about loosing at yarn chicken and you wont have lots of yarn scraps.

When you get to the last ball of colour, you will need to finish at the end of the row to keep the edge neat. I started the last row and then had to frog back when I realised I wasn't going to reach the other side.

I do hope you enjoy making this easy, mindful blanket. Please tag me in your post if you decide to make it with my instructions, I would love to see it!
@Little_Crochet_Makes


Friday, July 26, 2019

#Sharkbiteicepop

If your kids are anything like my little boy, he has to have a tea towel or kitchen roll wrapped around his ice lolly, just so he can hold them without getting cold fingers. Here is the #Sharkbiteicepop cover pattern...

Notes:
This is written in UK terms. As with all items made for children, please make sure that everything is sewn together extra securely. I designed and wrote the pattern in the UK heatwave, so if you come across any errors, please let me know.

What you will need:
  • Hobbycrafts Knitcraft Cotton Blend Plain DK yarn 25g for the sharks body (in colours teal, denim or light blue)            
  • Small safety eyes or black yarn
  • Hobbycrafts Knitcraft Cotton Blend Plain DK yarn in white for the teeth
  • Darning needle
  • Scissors
  • 3.5mm hook (I tend to crochet loose, if your tension is tight, please go up a hook size)
  • A Mr Freeze freezepops (I picked up in Tesco)
Stitches used:
Ch - chain
Dc - double crochet
Tr - treble crochet
Htc - half treble crochet
Blo - back loop only
Ss - slip stitch
St/sts - Stitch/s
Dc2tog - double crochet 2 together (decrease)
Fo - fasten off

Shark Body:
(Leave a long tail for sewing the bottom of the shark later)
Ch15, ss in 1st ch to form a loop. 
R1 - Ch1 (counts as 1st dc), dc in each st, ss to join to the ch1 (14 sts)
R2 - R17 - repeat row 1 (not turning the work, continually go around) 
(depending on your tension or brand of ice lollies, you may need to increase or decrease the number of rows)

Shark Jaws: 
R18 - Ch2 (counts as 1st tr), 2tr in the same st, htc, 3ss, htc, tr, 2tr in same st, htc, 2ss, htc, tr in the base of the ch2, ss in the top of the ch2. (16 sts)
R19 - Ch2 (counts as 1st tr), 2tr in the same st, htc, 4ss, htc, tr, 2tr in the same st, htc, 3ss, htc, tr, ss in the top of the ch2 to join. FO. (18 sts)

Teeth:
R20 - Using the white yarn, attach to any st of the jaw. 18 ss blo around the mouth, ss to join to the beginning of the white. FO (use a loose tension, if too tight you will struggle to put a ice lolly in)

Fins (make two alike):
(Leave a long tail for sewing up)
R1 - Ch6, 5dc to end , ch1, turn (5 sts)
R2 - 2dc, 2dctog, dc, ch1, turn (4 sts)
R3 - 4dc, ch1, turn (4sts)
R4 - dc, 2dctog, dc, ch1, turn (3 sts)
R5 - 2dctog, dc, FO (2 sts)
With the long tail, sew one fin on the top of the back. The other fin, sew on the side of the body at a slight angle - see picture for a guide.

Tail fins:
Firstly, using the long tail from the starting ch of the body, sew up and close the bottom of the shark.
R1 - Ch7, ss in 1st ch from the hook, dc, 2htc, 2tr (6 sts)
R2 - Ch7, ss in 1st ch from the hook, dc, 2htc, 2tr (6 sts) 
Leaving a long tail for sewing. FO
Sew the tail fin, attaching to the bottom of the shark, see picture for guidance.

Place safety eye in position or use black yarn. 

Sew in all ends and enjoy!

if you make one, please tag me @little_crochet_makes or by using #sharkbiteicepop so that I can see your creations! Xx    


Saturday, July 7, 2018

How to: Up-cycle Flip Flops


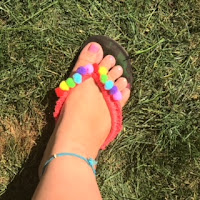
I had a pair of much loved flip flops that had started to look a bit tatty, so I decided to give them a make over. I wanted to up-cycle them rather than just put them into the bin. 
Here is how I did it

What you will need:
  • Pair of flip flops
  • 4.5mm hook
  • Yarn (I used cotton, as I thought it would be better against the skin
  • Mini pom poms/beads/sequins for decorating or just leave plain

1) Tie a secure knot around the toe separator

2) Using your hook, go under the flip flop strap

3) Pull the yarn under (one loop on the hook)

4) Yarn over and pull through the loop

5) One loop on the hook

6) repeat steps 2-5 until the strap is fully covered

7) Push the stitches towards the toe separator to make sure the strap is full up. Repeat on the other straps, then fasten off and weave in your ends. To finish, decorate with pom poms, beads or sequins

Tuesday, July 3, 2018

Life's a beach bag


I created this bright and fun beach bag for a crochet workshop. You can make this as colourful as you like, or keep it plain and simple. I look forward to seeing your completed makes. Please tag your pictures on Instagram with #lifesabeachbag and/or @little_crochet_makes

Tension isn’t that important but for a guide, my finished bag measured roughly 57cm width and 33cm length. 

This pattern is written in UK terms.   

What you will need:
·       5mm Crochet Hook
·       DK Yarn 200g (Cotton/Cotton mix would hold the shape of the bag better but mine was made with acrylic and I used for the weekend and it was ok )
·       Yarn needle
·       Scissors
Optional (for decoration)
·       Pom Pom maker
·       Contrasting DK Yarn for the pom poms
Stitches used:
Ch – Chain
Tr – Treble Crochet
Dc – Double Crochet
Htr – Half Treble Crochet
Ss – Slip Stitch
St/Sts – Stitch/Stitches
Flo – Front Loop Only
Tr2tog - Treble 2 together (decrease)
Htr2tog – Half Treble 2 together (decrease)
2Htr in next st – 2 Htr in the same stitch (increase)
WS – Wrong side

 Base of the bag
1)      Ch 50, Tr in the fourth st from hook (first 2 Tr made), Tr in each st to the end (49)
2)      Ch 3 (counts as first Tr), turn, Tr in each st to the end (49)
3 - 7)   Repeat row 2

Sides

You will now be working all the way round the rectangular base

8)   Ch 1, turn, working in flo Htr in next 48 sts along the long edge, evenly space 18 Htr along the short edge, working in flo Htr in the next 48 sts along the long edge, evenly space 18 Htr along the last short edge, Ss in the beginning Ch 1 to join (132)

9) Ch 3 (counts as first Tr), Tr in the next 48 sts, Tr2tog, Tr in the next 13 sts, Tr2tog, Tr in the next 45 sts, Tr2tog, Tr in the next 15 sts, Tr2tog in the last two sts, ss to join (126)
10) Ch 3 (counts as first Tr), 2 Tr in the same space, skip 3 sts, then work 3 Tr (I call this a Tr cluster) into next st, *skip 3 sts, 3 Tr cluster into next st, repeat from *39 times, Ss into the top of the Ch 3 to join (42 Tr clusters)

You will now be working in the spaces of Tr clusters from the previous row

11) Ch 3, turn, 2 Tr in the same st space, * 3 Tr clusters in the next cluster space, repeat from * 40 times, Ss into the top of the Ch 3 to join (42 Tr clusters)

12 - 29) Repeat row 11 (or until it your bag measures 23cm from the start of the Tr clusters row 9)

I changed colour on row 24, you can change colour earlier or make your bag in one colour

30) Ch 1, turn, Htr into each st, Ss to join (126)

31) Ch 1, turn, Htr into each st, Ss to join (126)

32) Ch 1, turn, Dc into each st, Ss to join (126)

Tie off and weave in ends

Handles (make 2)

33) Ch 10, Htr in the second Ch from the hook (first 1 Htr made), 8 Htr to the end (9 Htr)

34) Ch 1, turn, 9 Htr to the end (9 Htr)

35-43) Repeat row 34

44) Ch 1, turn, 1Htr2tog, 7 Htr to the end (8 Htr)

45) Ch 1, turn, 1Htr2tog, 6 Htr to the end (7 Htr)

46) Ch 1, turn, 1Htr2tog, 5 Htr to the end (6 Htr)

47) Ch 1, turn, 1Htr2tog, 4 Htr to the end (5 Htr)

48) Ch 1, turn, 5 Htr to the end (5 Htr)

49-73) Repeat row 48

74) Ch 1, turn, 2Htr in next st, 4 Htr to the end (6 Htr)

75) Ch 1, turn, 2Htr in next st, 5 Htr to the end (7 Htr)

76) Ch 1, turn, 2Htr in next st, 6 Htr to the end (8 Htr)

78) Ch 1, turn, 2Htr in next st, 7 Htr to the end (9 Htr)

79 - 88) Repeat row 78 

Tie off and weave in ends – Make one more

To make up

Position your handles 25cm apart, roughly 8cm in from the sides. Place the handles about 2.5cm inside the (WS) of the bag and do a running stich with a yarn needle and the same colour yarn as the bag. Make sure the handles are attached securely, then tie off and weave in ends.

Decoration (optional)
I attached 3 pom poms in a contrasting yarn to decorate, but you can make tassels, crochet flowers or leave the bag plain. The choice is yours

The pattern and photographs of this design are the property of Little Crochet Makes. This pattern and design are subject to copyright and are for personal, non-commercial use only. You may not distribute or sell this pattern or any items created using the instructions in this pattern without consent.

Monday, June 11, 2018

Summer Coasters - Free Pattern


I recently picked up some summery glasses for my garden and wanted to make fun coloured coasters to match. These are quick to make and don't use a lot of yarn. If you make some using this pattern, please post a picture on Instagram and tag me @little_crochet_makes - I love seeing my patterns made up.

Written in UK terms and will measure 13cm in diameter 

What you will need:
Crochet Hook 4mm
Yarn used - Hobbycrafts Knitcraft Cotton Blend Plain DK in colours Coral, Yellow, Teal and Orange
Scissors
Yarn needle

Stitches used:
SS - Slip Stitch
CH - Chain
TR - Treble Stitch

1) CH 6 and SS to the first CH to join to form a circle

2) CH 3, 19 TR in the circle, SS in the top of the first CH 3 to join (20 TR)

3) CH 3, TR, *CH 2, TR, TR, repeat from * 8 more times, CH 2, SS into the top of the first CH 3 to join. (10 x 2TR clusters, separated by 2 CHs)

4) CH 6, 3 TR in the CH 2 space, * CH 3, 3 TR in the CH 2 space, repeat from * 7 more times, CH 3, 2 TR in the CH 2 space, SS into the 3rd CH to join. ( 10 x 3 TR clusters, separated by 3 CHs)

5) *6 TR in the CH 3 space, SS across in the top of the 3 TRs, repeat from * 9 more times, SS across the remaining TR and SS into the top of the first TR to join. ( 10 x 6 TR clusters)

Tie off and weave in ends

You may want to block if they don't lay flat - I hope you enjoy making them!


Saturday, April 28, 2018

Little Butterfly Gown Pattern

Designed and named for the non-profit organisation - Upon Butterfly Wings (www.uponbutterflywings.org.uk)


This is an easy pattern, suitable for a beginner and shouldn't take too long and doesn't use a lot of yarn to make. Please note that this is written in UK. Should you use this pattern, please tag me in your makes if posted on Instagram - I would like to see how my pattern has helped.


This gown is sized to fit around 22-26wk, by upping the hook size/or yarn size will increase the overall size of the gown. If you are making it larger, add a few rows for the length.


Stitch terms used:
Ch - Chain
Tr - Treble Crochet
St - Stitch
Sk - Skip
Htr - Half Treble
Sl st - Slip Stitch

You will need:
3.5mm hook
DK yarn (Upon Butterfly Wings have colours they prefer on their FAQ page)
1 length of ribbon to tie up at the back
Tapestry needle for weaving in ends
Scissors
Contrasting DK yarn for the edging (optional)

1) Ch24, tr in the second stitch from the hook, 2tr in the next st, *tr in the next st, 2tr in same st* repeat to the end (34)

2) Ch2, turn, *tr in the next 2sts, 2tr in the same st* repeat until you have 3 st left. Tr in each of these (44 inc turning ch)

3) Ch2, turn, *tr in the next 3sts, 2tr in the same st* repeat to the end (54 inc turning ch)

4) Ch2, turn, tr in the next 7sts, ch2, sk12 st, tr in the next 14sts, ch2, sk12 st, tr in the last 8sts (34 inc the chs)

5) Ch2, htr to end - inc the ch2 st in arm holes (34)

6 - 14) Ch2, tr to end (34) - or repeat row 6 until desired length

Weave in the ends

Coloured neckline:

Change to a different coloured yarn and attach to one corner of the neck, Ch1, then htr along to the end of the neck (24 inc ch) - weave in ends

Coloured Scalloped edge:

Attach to the bottom corner of the gown, ch1, *3htr in the next st, sl st in the next st* repeat to the end (65 - inc sl sts and ch1) - weave in ends

To finish, thread a ribbon through one side of the back and thread through the other side and tie in a bow


Hopefully this pattern is easy to follow, but any questions you may have please get in touch.